其它杂项
计划任务
- 使用定时任务前,您应该先了解ThinkPHP的自定义命令
- 自定义指令的相关文档: https://www.kancloud.cn/manual/thinkphp6_0/1037651
- 原理分析:
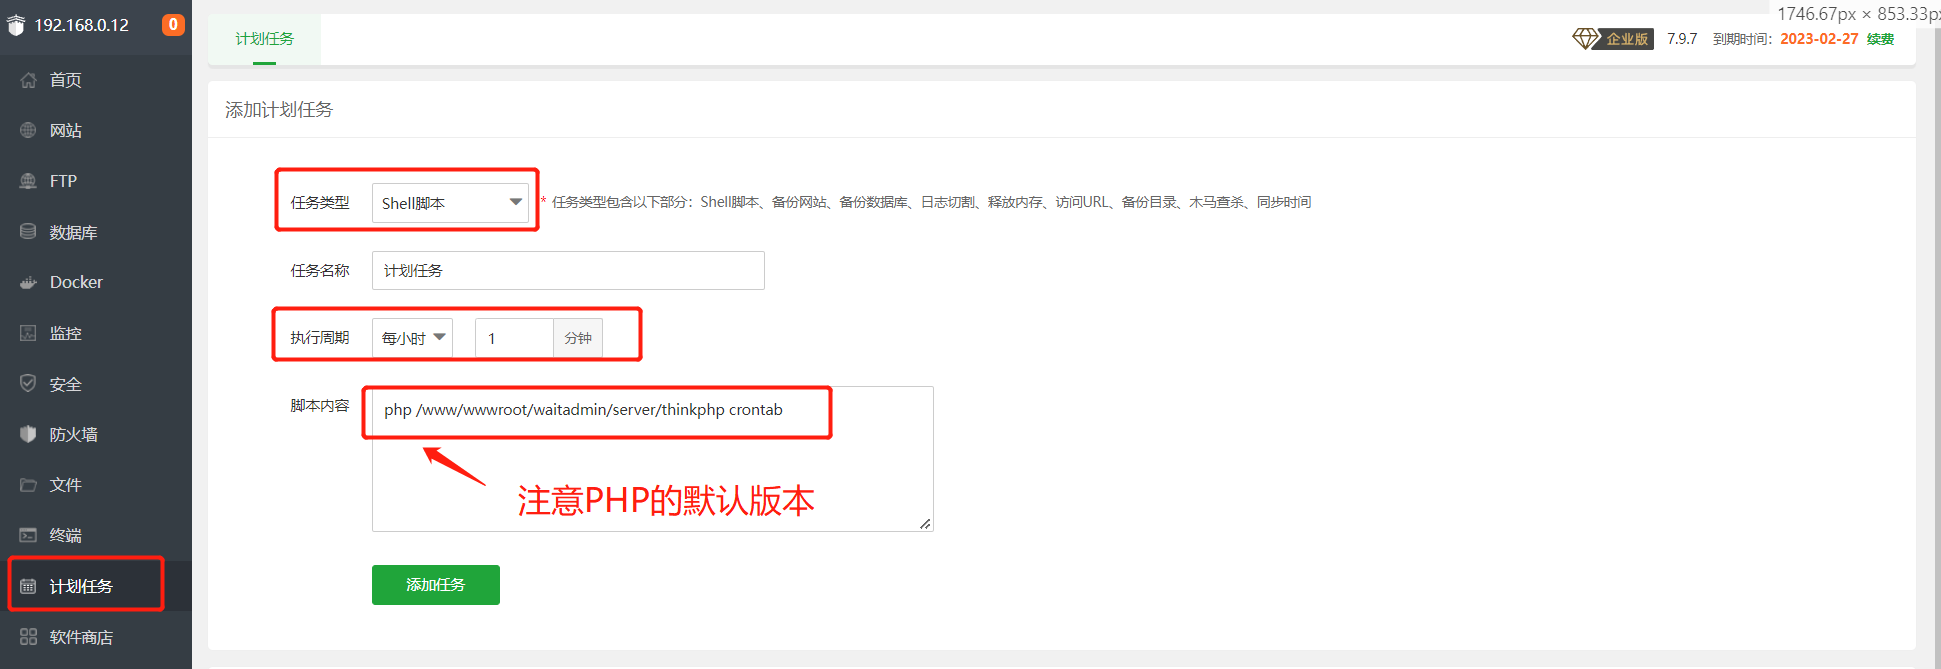
- 1、先在宝塔面板设置计划任务,执行的命令是php think crontab
- 2、这样系统就可以每各一段时间就会执行 crontab的自定义指令
- 3、crontab自定指令再去调度其它的任务
- 4、所以说crontab就是计划任务的从调度器
- 5、因为是使用Linux的crontab,所以执行最少粒度是1分钟每次,如果您要每秒中执行,你可以考虑swoole或者shell脚本实现
注意
// 我自己要实现一个计划任务应该怎么写?
// 1、代码写在: app/common/crontab/
// 2、然后添加配置: app/config/console.php
// 3、PS: 额外增加计划任务,基本就动这两个地方,可自行参考系统的代码。
注意
其它说明:
app/common/crontab : 自定义计划任务目录
app/common/command : 自定义指令目录
自定指令
php think wa
===============指令工具箱==============
(1) 修改后台密码   (2) 清除登录限制
(3) 修改入口路径   (4) 清除系统缓存
=======================================
【修改后台密码】
    命令: php think wa 1 --account admin --password 123456
    参数:
        --account  : 要修改的账号
        --password : 变成什么密码

【清除登录限制】
    命令: php think wa 2 --account admin
    参数:
        --account  : 要清除限制的账号

【修改入口路径】
    命令: php think wa 3 --name xglle.php
    参数:
        --name  : 入口的名称

【清除系统缓存】
    命令: php think wa 4
    参数:
        无
图片预览
- 此方法实现了点击一下图片放大图片的功能
previewImage只要在img图片上加上此类即可
<!--
    说明: table-image-wrap
    问: 为什么要用在这个方法包裹?
    答: 因为这里定义了宽度和高度以及圆角,只要图片包裹了,那么图片就不能超出宽高
    注: 此类只有在数据表格列表的时候才生效,别的地方不生效的
    其它值:
        .table-image-wrap : 默认: 28px x 28px
        .table-image-wrap.size-40-40
        .table-image-wrap.size-50-50
        .table-image-wrap.size-60-60
        .table-image-wrap.size-70-70
        .table-image-wrap.size-80-80
-->

<div class="table-image-wrap">
    <img src="{{ d.image }}" alt="img" class="previewImage">
</div>
导入导出
【导出】
导入: use app\common\service\excel\ExcelDriver;
调用: ExcelDriver::export(array $fields, array $lists, array $options = []);
注意
1、由于 Spreadsheet 工具的内容实在太多,我们只能封装常用的方法。
2、如果此封装的方法没有办法满足您的业务需求,可以自行构建进行使用。
3、当然如果您更好的更强大的实现方式,可以在Gitee上贡献您封装的代码
4、PS: 导入导出都是使用的: $spreadsheet = new Spreadsheet();
- 参数说明:
| 名称 | 是否必须 | 说明 | 示例值 |
|---|---|---|---|
| $fields | 是 | 字段名称 | /www/runtime/11.xlsx |
| $lists | 是 | 列表数据 | ['A'=>'name', 'B'=>'mobile', 'C'=>...] |
| $options | 否 | 配置参数 | |
| - | exportName | 导出名称: 默认 excel | |
| - | exportMethod | 导出方式: [flow=流式(默认), path=路径] | |
| - | exportPath | 导出路径: [系统路径: path模式下需要,且必须] | |
| - | headerRowHeight | 行头高度: 默认 30 | |
| - | cellOtRowHeight | 每行高度: 默认 22 | |
| - | - | ||
| fontStyle | 字体样式 | ||
| - | name | 字体 | |
| - | size | 大小: 如 22 | |
| - | bold | 加粗: false/true | |
| - | color | 颜色: #000000 | |
| - | italic | 倾斜 | |
| - | underline | 线条 | |
| - | - | ||
| headerStyle | 行头样式 | ||
| - | ['font']['bold'] | 加粗: false/true(默认) | |
| - | ['font']['color'] | 颜色: ['argb' => '000000'] | |
| - | ['font']['size'] | 大小: 12 | |
| - | ['fill']['fillType'] | 填充类型: Fill::FILL_SOLID | |
| - | ['fill']['startColor'] | 填充颜色: ['argb' => '999999'] | |
| basisStyle | 基础样式 | ||
| - | borders | “边框样式”,默认有黑边框,配置是个数组,看代码 | |
| - | alignment | “单元格居中”,默认居中,配置是个数组,看代码吧 |
- 代码示例:
namespace app\frontend\controller;

use app\common\model\Test;
use app\common\service\excel\ExcelDriver;

class IndexController extends Frontend
{
    public function import()
    {
        // 设置表头的字段
        // key是对应数据的字段名称, 值是表头的名称, 如果值是数组[标题名称=>宽度]
        $fields = [
            'name' => ['客户姓名'=>60], // 指定宽度 60
            'mobile' => '联系电话' // 不指定宽度,默认值是 30
        ];

        // 要导出的数据列表, 这里的数据你可以从数据库中查询,组合成这样的格式
        // 注意: 字段列表数需要对应你表头的数量,否则可能报错
        $lists = [
            ['name'=>'小明', 'mobile'=>'13800138000'],
            ['name'=>'小红', 'mobile'=>'12800128000'],
        ];

        // 调用导出的工具
        // 返回的$path, 导出方式是path的时候才返回,否则flow模式返回空值
        $path = ExcelDriver::export($fields, $lists, [
            // 导出的名称: 非必须, 默认excel
            'exportName'   => '所有客户表格',
            // 导出的方式: 默认是flow
            'exportMethod' => 'path',
            // 导出路径: [系统路径: path模式下才生效],不填使用默认,最终路径看path的返回值
            'exportPath'   => '/www/runtime/user.xlsx',
            // 看多其它参数看文档 ...
        ]);
    }
}
【导入】
- 工具方法:
导入: use app\common\service\excel\ExcelDriver;
调用: ExcelDriver::import(string $path, array $fields, array $options = []);
- 参数说明:
| 名称 | 是否必须 | 说明 | 示例值 |
|---|---|---|---|
| $path | 是 | xlsx路径 | /www/runtime/11.xlsx |
| $fields | 是 | 字段数组 | ['A'=>'name', 'B'=>'mobile', 'C'=>...] |
| $options | 否 | 配置参数 | |
| - | skip | 跳过第几行: 默认为 1,跳过表头行 | |
| - | write | 写入数据行: 默认: false,开启后 model参数必填 | |
| - | model | 模型类: 默认为null, 示例: Article::class |
- 代码示例:
namespace app\frontend\controller;

use app\common\model\Test;
use app\common\service\excel\ExcelDriver;

class IndexController extends Frontend
{
    public function import()
    {
        // 定义每个列的字段名,把列表字母 转 数据库的字段名称
        // 这里的A、B表示的就是表格顶行列名称
        $fields = [
            'A' => 'name',
            'B' => 'mobile'
        ];

        // 这里定义的是你要导入的xlsx文件路径
        $exportPath = root_path().'runtime/excel.xlsx';

        // 执行导入处理,失败会抛出错误, 成功返回数组(对应表格的每行数据)
        $results = ExcelDriver::import($exportPath, $fields, [
            'write' => true,
            'model' => Test::class
        ]);

        // 这里展示一下 $results 返回的数据格式 (实际应用中你可以忽略它,这里只是给你看一下)
        // 当然了如果你 配置参数 write 设置为false时,你也可以用下面的格式自行写入数据库
        [
          0 => [
            "name" => "小明"
            "mobile" => "13800138000"
          ]
          1 => [
            "name"   => "小红"
            "mobile" => "12800128000"
          ]
        ]
    }
}
【操作】
- 从互联网上整理了一些
Spreadsheet工具的函数 - 其它不了解的请查百度谷歌
<?php

// 给类文件的命名空间起个别名
use PhpOffice\PhpSpreadsheet\Spreadsheet;

// Xlsx类 将电子表格保存到文件
use PhpOffice\PhpSpreadsheet\Writer\Xlsx;

// 实例化 Spreadsheet 对象
$spreadsheet = new Spreadsheet();

// 获取活动工作薄
$sheet = $spreadsheet->getActiveSheet();

// 设置单元格的值
$sheet->setCellValue('A1','10');
$sheet->setCellValue('B1','15');
$sheet->setCellValue('C1','20');

// 批量赋值单元格
$sheet->setCellValue('A1','ID');
$sheet->setCellValue('B1','姓名');
$sheet->setCellValue('C1','年龄');
$sheet->setCellValue('D1','身高');
$sheet->fromArray(
    [
        [1,'欧阳克','18岁','188cm'],
        [2,'黄蓉','17岁','165cm'],
        [3,'郭靖','21岁','180cm']
    ],
    3,
    'A2'
);

// 合并单元格 合并后,赋值只能给A1,开始的坐标。
$sheet->mergeCells('A1:B5');
$sheet->getCell('A1')->setValue('欧阳克');

// 设置单元格内容和样式
$sheet = $spreadsheet->getActiveSheet();
$cell = $sheet->getCell('A1');
$font = $cell->getStyle()->getFont();
$font->setName('Arial');
$font->setSize(12);
$font->setBold(true);
$font->setColor(new \PhpOffice\PhpSpreadsheet\Style\Color(\PhpOffice\PhpSpreadsheet\Style\Color::COLOR_RED));
$font->setItalic(true); // 斜体:使用 setItalic(true) 方法可以将字体设置为斜体。
$font->setUnderline(\PhpOffice\PhpSpreadsheet\Style\Font::UNDERLINE_SINGLE);
// 下划线:使用 setUnderline($type) 方法可以给字体添加下划线。$type 参数可以取以下值:
    // Font::UNDERLINE_NONE:无下划线(默认值)
    // Font::UNDERLINE_SINGLE:单下划线
    // Font::UNDERLINE_DOUBLE:双下划线
    // Font::UNDERLINE_SINGLEACCOUNTING:单下划线会计样式
    // Font::UNDERLINE_DOUBLEACCOUNTING:双下划线会计样式

// 删除线:使用 setStrikethrough(true) 方法可以给字体添加删除线。
// 上标和下标:使用 setSuperscript(true) 方法可以将字体设置为上标形式,使用 setSubscript(true) 方法可以将字体设置为下标形式。
// 字体边框:使用 setBorder(...) 方法可以为字体添加边框效果。通过传递合适的参数来指定边框的类型、颜色和粗细。


// ================ 表格的读取方法 ============
// 创建读操作
$reader = \PhpOffice\PhpSpreadsheet\IOFactory::createReader('Xlsx');
# 打开文件、载入excel表格
$spreadsheet = $reader->load($file);
# 获取活动工作薄
$sheet = $spreadsheet->getActiveSheet();
# 获取总列数
$highestColumn = $sheet->getHighestColumn();
# 获取总行数
$highestRow = $sheet->getHighestRow();


// ================ 导出的操作 ============

// Xlsx类 将电子表格保存到文件
$writer = new Xlsx($spreadsheet);
$writer->save('1.xlsx'

// 客户端文件下载
header('Content-Type:application/vnd.ms-excel');
header('Content-Disposition:attachment;filename=1.xls');
header('Cache-Control:max-age=0');
$writer = \PhpOffice\PhpSpreadsheet\IOFactory::createWriter($spreadsheet, 'Xls');
$writer->save('php://output');